Lurie-Houghton Telescope - Testing and Use
by Rick Scott
Some Assembly Required
First Light
The Night of June Third
Foucault Testing
The Night of July First
Powder Coating and Back to Page, Arizona
Back in Phoenix
Star Parties 2000
RTMC 2001
To Page and Back 2001
Star Parties 2001
Vega Star Test
Some More Comments
Anti-Reflection Coating
Conclusion
It Still Works Great
I had what I like to call a "test phase" first light on 16 May 2000 at Mike Spooner's shop in Page, Arizona. Mike had finished the mirror and lenses and the fabrication of the metal parts were also complete by then. None of the metal parts had been powder coated yet, but I did apply a temporary finish of flat black paint to the inside of the aluminum tube for testing purposes.
Originally, my plans were to assemble the scope for the first time in Page and perform some initial testing. I would then perform extensive testing and observing through the end of June or beginning of July to learn of any modifications I may have to make. During the Arizona monsoon season of July, August and September, I would take the scope apart to have the corrector lenses anti-reflection coated and powder coat the metal parts. Plans and reality don't always agree, here's the story. . .
I spent two nights in Page. The first evening Mike showed me the mirror and lenses. They are a work of art. He set up the mirror on his test stand and showed me what it looked like through his modified Foucault tester which uses a Ronchi grating instead of a knife edge. I had never done optical testing of a mirror prior to this, only star testing of completed telescopes, so it took me some time to figure out what I was looking at. Mike mentioned that the mirror had a slight zone, but to my untrained eyes it wasn't visible. We proceeded to bond the mirror to the yoke of the primary mirror mount with clear silicone adhesive. We allowed the silicone to cure overnight and left the assembly of the rest of the telescope for the next day. This was Monday night, the 15th of May.
On Tuesday, we assembled the corrector lens assembly. This was the first time the entire corrector was assembled with the secondary mirror, its mount and the plastic shims to center the lenses and protect the glass from direct metal contact. I cut the shims from its sheet stock at Mike's shop using the corrector cell as a stencil. I couldn't do this at home, because I had previously sent the cell to Mike to use in his testing of the optics. Mike has a couple of reference flat mirrors that he uses to perform a true double pass null test on completed telescopes. By using this technique, he can test and fine tune the optics. He did this on my Lurie-Houghton scope by slightly aspherizing the last lens surface to minimize final traces of spherical aberration.
By mid afternoon we had the primary mirror and mount installed in the tube and were putting the corrector assembly into the tube when we encountered a minor problem due to the tube being not quite round. The corrector cell is held in place with three screws that pass though holes in a flange on the cell and into threaded holes on a ring inside the telescope tube. The holes didn't quite line up so we took the corrector apart and enlarged the holes in the flange. After reassembling the corrector, we installed it in the tube and proceeded to collimate the scope using a sight tube made from a 35mm film canister and a commercial laser collimator.
The scope was now ready for testing with starlight. I assembled my equatorial mount in the yard behind Mike's shop and put the scope on it. This was a first, the newly assembled Lurie-Houghton telescope on the mount ready to look at stars. The sky that night wasn't very cooperative, the seeing was not all that great and clouds were coming in.
We started by looking at the almost full moon since it was up and the sky was not dark yet. We were impressed even with the fair seeing. The contrast was very good and the limb of the moon was sharp with mountains easy to see. There were no color fringes visible and detail snapped into focus as the focus was varied. When the sky was dark enough we turned our attention to Castor to see what a star would look like, the ultimate test.
Castor snapped into focus and was a dazzling sight. Defocusing about eight to ten wavelengths on either side of focus showed that the correction was good with evidence of a slightly turned edge, but not so bad as to be objectionable. Slight defocusing revealed what looked like slight pinching, the diffraction rings had three "corners", but they weren't spaced equally. The shape also varied a little on either side of focus. We loosened the screws on the clamp ring that holds the lenses in the corrector cell to see if the pinching was coming from that but it didn't change anything. We also loosened the screws that holds the cell into the scope tube and that didn't help either. We knew from individual component testing that the problem was not in the primary mirror, so it was most likely ground into the lenses.
Ok, so it wasn't perfect the first time out, but it was very good and I decided to take the scope home for extensive testing. At this point, I modified my original plan. I spent the next couple of months testing the scope to determine any modifications and then let Mike have the complete scope through September to do more polishing on the lenses to fix the pinching problem.
I took the scope out for testing at my astronomy club's monthly deep-sky star party. I had learned from the drive home from Mike's shop in May that the front (positive) lens rotates in the cell from vibration. This by itself is not a real problem but the secondary mirror is attached to this lens so it rotates with it. Rotating it back into proper position is very easy with the laser collimator. All I have to do is grab the front of the secondary mirror mounts which protrudes past the front of the lens and turn it until the hologram pattern from the laser is centered on the primary mirror. This takes just a few seconds once the laser is in the focuser.
One of my friends from the club offered to help with collimating the primary mirror. He looked through the eyepiece watching a star and keeping it centered while I turned the collimation bolts. When he said the scope was collimated I tightened the collimation lock bolts only to have him say that the collimation changed. We did this a few times before I realized what was going on. It turned out that the six bolts that hold the main ring of the primary mirror mount to the telescope tube had come loose. After tightening these bolts, the collimation procedure worked very well without any shifting. This was one of the items I modified due to my testing of the scope. The bolts were #6-32 cap screws, but I later redrilled and tapped the holes to use #10-32 cap screws. The larger bolts allowed me to use a higher torque to hold the ring more securely. That was the last time I had any collimation problems due to the primary mirror. That was a good lesson learned.
The eyepieces in my collection at the time of this star party were all 1.25" Meade series 4000 Plossls. The ones I have are 26mm, 15mm 9.7mm, 6.4mm and a Meade #126 short Barlow. I built the scope with a 2" focuser knowing that eventually I would get some 2" eyepieces, but until I figured out what to get I planned on borrowing some at star parties and see what I liked. There weren't any good planets to observe during that summer, but open and globular star clusters looked great through the scope. Wide field views were really exciting. I borrowed a couple of 2" Tele Vue eyepieces to try out, a 27mm Panoptic and a 31mm Type 5 Nagler. Both eyepieces offered great views, but I was most impressed with the combination of the 31mm Type 5 along with the optical properties of the Lurie-Houghton design. The field had pin point stars across a two degree field of view! With the 31mm, I was able to get both the Lagoon and Trifid nebulas in the same field, what a sight that was. I had so much fun using the scope that night that I ended up observing to about four in the morning.
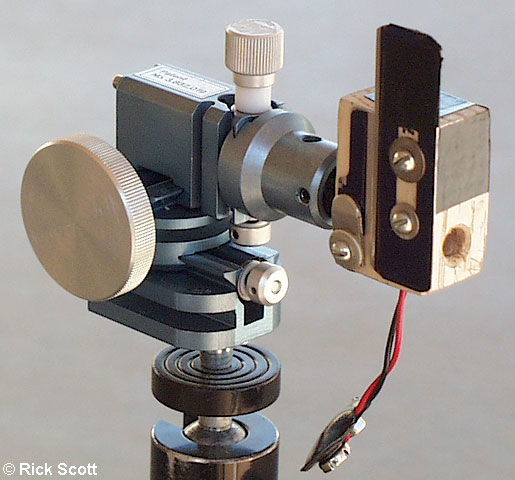
Since I had a month before the next desert outing with the scope, I decided to try my hand at some optical testing of the mirror and lens surfaces. I built a knife edge Foucault tester after some research on the web. I used a bright green LED mounted in a small block of wood and two carpet blades for the slit. One of the blades extends above the block to act as the knife edge to cut into the reflected beam of light. I mounted this assembly on an X-Y-Z positioning stage from a probe station that's normally used to position a test probe on a bare integrated circuit chip. I took this photo of my Foucault tester with my Olympus D-620L digital camera and processed the image in Adobe Photoshop.
I first tested the mirror attached to its mount in the telescope tube. All previous tests on the mirror was performed by Mike before it was bonded to the mirror mount. I wanted to test the mirror to make sure that it wasn't being pinched by the mount. After some fumbling around with the test setup, I was able to see the Foucault image just as I've read about in various telescope making books. I was excited because this was the first time I've done this on my own and it really worked well. The primary mirror in the Lurie-Houghton design is a spheroid and not a paraboloid as in a Newtonian telescope. This means that the entire image should go black when the light beam is cut off at the center of curvature of the mirror. After careful adjusting, I was able to find this point and was able to see this effect. The only perturbation I was able to see was the zone that Mike had told me was on the surface. The image was textbook perfect for a spheroidal mirror with a single slight zone. There was no evidence of spherical aberration, pinching or astigmatism.
I then tested the negative lens since it consists of two spheroidal concave surfaces. Mike did slightly aspherize the last or rear surface to minimize residual spherical aberration in the completed telescope assembly, so I would see the effect of this on that surface. The testing I was performing was not to look for non-spheroidal surfaces, but to look for evidence of ground in pinching or astigmatism. The Foucault image from the lens surfaces were not as bright as the image from the mirror because the lenses don't have that nice reflective aluminum coating, but was certainly more than bright enough to perform the test. Testing revealed that both lens surfaces did not show any signs of pinching or astigmatism, so the problem had to be in the positive lens.
Convex surfaces are not tested with a Foucault test unless used with other auxiliary optics such as a Hindle sphere. I decided to try an experiment and look for the reflection of the surface away from the tester with the light passing through and being refracted by the front surface. I figured that the rear surface is concave to the tester and that the effect of the front surface would be to add significant spherical aberration to the test. If the lens had no ground in pinching or astigmatism I should be able to determine this from the image. If there was any distortions other than spherical aberration it would also affect the light the same way in the telescope. Doing the test this way is also very sensitive because the light has to pass through the lens twice, once on the way in and then on the way back out towards me.
The results from testing the positive lens was very interesting and almost psychedelic. The image swirled around as I moved the tester through focus, at times looking like the Yin and Yang symbol. The spherical aberration was extreme, but the swirling pattern indicated to me that something was not very symmetrical about this lens. The effect was visible looking through either lens surface, but with different effects as the focus was varied. Careful examination showed that the effect was not three pointed but seemed to have even symmetry, so I decided that the problem is really some form of astigmatism and the three lobed shape was due to some other interaction in the optics. I was now considering astigmatism or pinching in the secondary mirror which was not in the scope when Mike was performing his tuning with the double pass null test setup.
The next test I performed was on the secondary mirror using a technique described in Harold Suiter's book, Star Testing Astronomical Telescopes. I used a 60mm refractor to inspect the image of a star reflected from the diagonal mirror. This was not an easy test to set up. I had to position both the mirror and the small telescope such as to be able to see the reflected star, Spica in this case. I first tested the scope directly on the star and found the optics to actually be very good. Then I inspected the reflected image from the mirror and could see no difference. I rotated the mirror 90 degrees and the image looked the same. With this test completed, I declared the secondary mirror to be good and not the source of my problems.
I felt good about identifying the problem to be astigmatism in the positive lens, so I reassembled the scope for the next star party. I planned on having Mike polish the positive lens to remove the astigmatism when I took the scope to him in July. During the reassembly, I decided to make a modification to the corrector cell. I added three threaded holes to the flange on the cell about an inch from the three mounting holes. By doing this I created a push-pull collimation adjuster for the corrector lens assembly. I figured that by carefully adjusting the perpendicularity of the lenses to the optical path, I would minimize any distortion creating effects from having the corrector lenses mis-collimated. I made a circular test fixture out of cardboard that just fits inside the telescope tube in place of the primary mirror. It has three red LED's spaced 120 degrees apart and equally spaced from its center. The center has a small hole to look through at the reflection of the LED's off of the lenses. I then adjusted the corrector collimation until the reflections were symmetrical. After that, I installed the primary mirror and collimated the rest of the telescope so it would be ready for the next star party. I had a very busy June!
This was the last outing to the dark skies of the Arizona desert before the monsoons and taking the scope back to Mike's shop for more polishing on the lenses to fix the astigmatism. Most people around here don't go observing in July because of the monsoon storms and the heat, but I went out to my club's site anyhow so I could use the scope. The storms hadn't come in yet and the sky was clear. Only two other people were at the club site that night. One was set up far from the center with a bright computer screen and a CCD camera on his scope. I set up next to the other person who has a very nice setup. He has an 8.5" Ceravolo Maksutov-Newtonian on an Astrophysics 900 mount and a whole case full of Tele Vue eyepieces. We spent the night comparing views and had a great time doing it. We had so much fun, we didn't quit until about five in the morning. I still didn't have any new eyepieces yet, so I spent a lot of time borrowing some of his. I also used his 2" UHC filter to great advantage.
Since we stayed up until dawn observing, we got to see a great many seasons worth of objects including Jupiter and Saturn. Through the Lurie-Houghton, the Veil nebula looked great with detail easily seen as wisps and strands. M31 was bright and the dominant dark lane was very easy to see and follow. Three arms and H-II regions were very easy to see in M33. Globular clusters were three dimensional and sharp. The special treat for me that night was my first sighting of Pluto. I had tried to find it in my 1974 Celestron 8, but could not see Pluto or any stars that dim in it. With my Lurie-Houghton and its very smooth optics courtesy of Mike Spooner, I was able to see stars down to about magnitude 14.8. That night, Pluto was about mag 13.7 and in a fairly sparse star field in a position that made identifying it easy. It was exactly where my planetarium program (The Sky by Software Bisque) showed it to be. I was able to identify all of the stars in the field down to mag 14.7 and Pluto was in a hole in the middle of them and matched the brightness of the 13.7 or 13.8 stars nearby.
Early in the morning, just before dawn, Jupiter and Saturn got up to about 20 or 25 degrees elevation. Even though they were low, I still looked anyway. The seeing wasn't great, but to be able to see these planets after not seeing them for many months was a joy. The views showed that the scope had good potential for planetary observing.
I was quite pleased with the performance of the scope. Even with the astigmatism it's a great performer.
Powder Coating and Back to Page, Arizona
After the July star party, I took the entire telescope apart to have the metal parts powder coated. A friend of mine from work who restores British sports cars, powder coated the corrector lens cell and secondary mirror support parts. I had a commercial painter in Tempe, AZ powder coat the tube. The internal parts of the scope and the inside of the tube was powder coated in black and the outside of the tube in white. I had a real tough time deciding on the color for the outside. Black would let the scope cool down faster at night, but white would reduce heating when the scope is exposed to the sun and would also make the scope easier to see at night. In the end I opted for the white.
Once the scope was reassembled after the powder coating, I took it to Mike's shop in August to have him do more polishing on the lenses to try to eliminate the astigmatism. Silvio Jaconelli, who was the president of my astronomy club in 1999 and 2000, came along for the ride to see Mike since he was making the optics for Silvio's 12.5" f/3.8 Dobsonian telescope.
Mike found through bench testing that rotating the negative lens had no effect on the image which verified my Foucault testing in June. He spent time polishing the positive lens and when he couldn't see the astigmatism in the bench tests, he started star testing. It was during the star tests that Mike learned that the centering of the lenses was critical. If they were not centered properly, he would see strange shaped stars. After getting the centering right, there was just a little bit of astigmatism left, but not enough to have a major effect on the image.
At the time, Mike was making his own version of the Lurie-Houghton scope with the same specifications as mine. When he got started on my scope he spent some time ray tracing the design and liked it a lot, so he decided to make one for himself. The mirror he made for his came out better than mine since it didn't have any zones. He swapped mirrors to see if there was any trace of astigmatism in it. That didn't change the astigmatism, but it did improve the star test somewhat.
Mike set his 6.1" f/10 Newtonian scope up for some comparison tests since this scope is an excellent performer on the planets. The following is a direct quote (with typos fixed) from an email he sent me after performing some comparison tests one night.
"With the seeing the L-H was still doing better and this 6.1" is a good scope. The 6" image was a bit more stable but considering the lesser seeing some of this is aperture related. Around the double-double I could pick out fainter stars with the L-H and with Saturn at low altitude and soupy seeing, I could see 4 vs. 2 moons and the cloud shading was easier to see on the ball of the planet. Admittedly not much detail but with the bad atmosphere I expected the 6" to best the 10" so I was happily surprised. Looked at Jupiter right on the horizon (bleah!) and then the Pleiades with a 34mm homemade eyepiece. WOW! The 22 Nagler should slay this object. I didn't try the 20mm. Need to save something to look at at the ALL AZ. :) Went to bed after this."
"Got up at 6:00 and went out to check big planets overhead. Couldn't find Saturn as it was too light so grabbed Jupiter in both scopes. Seeing was much better than last night but not superb. It looked good in both scopes and I spent a lot of time with the L-H and a little just to get comparison views with the 6". The apparent contrast was better in the 6" perhaps but the L-H showed more detail and showed it easier. I defocused the image slightly and could see no astigmatism. Spherical correction using this test looked very good with ever so slightest softness inside vs. outside. . . The SEB was split with a darker band of material in it's southern half and festoons were seen though faintly - I couldn't pick them out with the 6" only occasionally so the seeing wasn't near the best as I've mentioned but the fact that the L-H outperformed this scope is significant. Ganymede showed a nice solid disk. I went to 382x (3mm Radian) and it held well but the best view was probably at 244x with the 4.7mm Meade or 287x with a 4mm Ortho."
Back in Phoenix
Toward the end of September, Mike came down to Phoenix and delivered the scope to
me. We set it up that evening for some informal viewing and a chance to test the
scope with some eyepieces that Mike brought along with him. There was still a very
slight amount of astigmatism, but this was only seen at high powers and with very
little defocusing. With just more than a little defocusing the astigmatism would
disappear into the expanding diffraction rings.
Jupiter and Saturn didn't come up until late in the evening so I got up early the next
morning to check them out. The seeing was not too good, but I had to look anyway. At
433x the view was soft, but was much better at 286x. I spent most of my time on
Jupiter and was amazed with the detail I've never seen before through my old 1974
Celestron 8. I was able to see detail and structure in the polar areas and the belts
were very well delineated. I also checked out the crescent moon and it looked great,
but the poor seeing was very evident. I could see heat waves moving across the moon.
Never-the-less, the moon still looked great with a lot of fine detail visible and
high contrast. I didn't check out the collimation or the alignment of the optics so
I spent the next evening with the laser collimator aligning everything. The alignment
was off a little, so the planetary views should get even better!
I decided to make another modification to the scope to help it cool off faster before
observing. I added three 1.5 inch vent holes just behind the corrector so that warm
air could flow out of them. I then made a rear cover with a 3 inch fan to force air
through the tube. The fan blows on the back of the mirror and then flows around it
and out the new vent holes. These holes also turned out to be useful for some lens
rotating and centering tests I conducted.
At this point I decided to go ahead and line the interior of the telescope tube with
flocked paper from Protostar. Because of the difficulty in reaching far inside the
tube, I kept the flocked paper on its backing paper and used strips of double sided
carpet tape to install it. With this done, the inside of the scope is now extremely
dark. I also lined the inside of the focuser and focuser extension tube. Another
thing I did was to use a black Sharpie pen and "paint" the edges of the lenses to
reduce internal reflections from the lens edges.
One night I set up the scope aimed at a fairly bright star near the zenith and
loosened the clamp ring holding the lenses in their cell. I then took advantage of
the new vent holes to gain access to the negative lens and rotate it. The astigmatism
was not affected by the rotation of the lens. I then rotated the positive lens to
see what effect it would have. The secondary mirror is attached to the positive lens
so I had to rotate it back into alignment each time. I found that the astigmatism
rotated directly with the rotation of the positive lens. I also played around with
the centering and learned that it affected the shape and amount of astigmatism and
on-axis coma, but when at the best position, there was still a very small amount of
astigmatism left. Mike and I have talked a lot about the astigmatism. The most
likely cause is the method used to mount the lens on the turntable of his grinding
and polishing machine. We have an idea on how to eliminate it, but for my scope that
will wait until the next monsoon season. In the meantime, I want to spend time using
the scope and enjoying the view. When we do finally take care of the astigmatism, the
view will be that much better and it'll be like having a new scope again.
Star Parties 2000
Besides planet viewing from my backyard, I've been taking the scope to my club's
deep sky star party every month that the weather has cooperated. In the year 2000,
it's been out to the October, November and December star parties. When I wrote this
paragraph at the end of February 2001, the weather has not worked out too well and
there were no deep sky star parties in January or February. I also took the scope to
a public star party on the 2nd of December way back in 2000. That night was special to
me because I finally got to see Saturn's moon Mimas. That makes seven moons of Saturn
I've now seen. I've tried to find it in the past with my old C8, but the light
scatter in it made the moon impossible to find. With the smooth optics that Mike made
for the Lurie-Houghton and a favorable position of Mimas that evening I was able to
see it, and this was from the city of Mesa, Arizona from a parking lot looking over
the lights from a fairly busy city street!
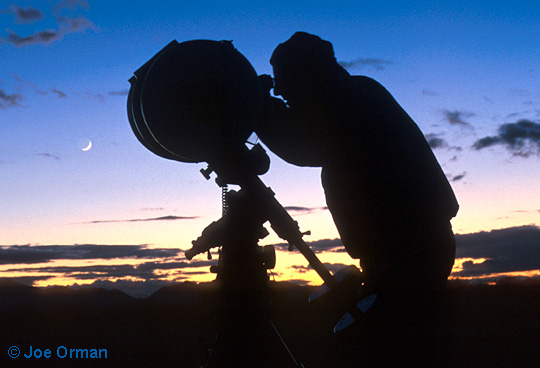
Here's a photo taken by my friend Joe Orman of me looking at the crescent moon at the
All Arizona Star Party 2000. This star party is hosted once a year in October by my
astronomy club, the East Valley Astronomy Club which meets in Scottsdale, Arizona.
RTMC 2001
I took the scope to the Riverside Telescope Makers Conference and entered it in the
telescope judging. With good fortune I was able to set it up in a 10'x7' Sky Tent. I
was planning on purchasing one and it was really nice to have my scope in the demo
tent to get a good idea of what it will be like to observe in a dome. I really liked
it. The first night was cool and breezy, but the tent provided a very comfortable
environment to observe in. The next day I borrowed a solar filter and found that
solar observing in the dome was great because I was able to position the dome slot
such that the scope could look through it and I was in the shade. VERY NICE!!
Saturday was judging day. The judges came by, looked over the telescope, and asked
me about it and any special features. They video taped me talking about the scope and
photographed it. Mike Spooner also entered his Lurie-Houghton telescope which is a
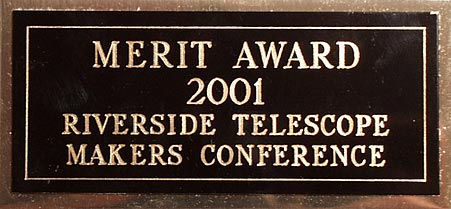
fraternal twin to mine. The awards were given out on Sunday night and Mike Spooner and
I received a merit award for "Collaborative Effort in Designing & Building a Pair of
Fine 9.8" f/4.6 Lurie-Houghton Telescopes".
To Page and Back 2001
After a few more star parties, I took the scope to Mike on the 7th of July, just as
the monsoons were starting up. He polished the positive lens (about an hours worth
of polishing time) and performed interferometry and star testing on it. He returned
it to me on the 23rd of August. I spent the next couple of days fine collimating the
optics and took it outside the following Friday for testing in my backyard. The
clamp ring for the corrector lenses was loose so I could rotate the positive lens to
see what effect it may have on any residual astigmatism. At this point the astigmatism
was virtually gone and was competing with my eye's astigmatism.
I found that if I rotated the positive lens just a little, I was able to effectively
cancel out any remaining astigmatism in the telescope. The only astigmatism left was
in my eye which rotated as I turned my head to different positions. I then started
star testing and was more than pleased with the results. The seeing was quite good
and I was able to stack my Barlow lenses to reach a magnification of 865X and see good
stars! At this magnification, I was able to see solid airy disks with a first
diffraction ring that was swimming around it due to the seeing. I then moved on to
epsilon Lyra, the Double Double, and was finally able to cleanly split these tight
pair of double stars. I could see black sky between them and good diffraction
rings even at 865X.
The next day (Saturday), I tightened the corrector lens clamp ring and rechecked the
collimation. That night I set up the scope for some final testing at home. The seeing
was as good as the night before so I spent a lot of time looking at stars at 865X.
They all looked great with solid airy disks and a good first diffraction ring. I
looked at the Double Double, M22, v Aquila, M11, M15, and the Veil Nebula. I couldn't
see the Veil without a UHC filter and just barely with it, because the last quarter
moon was still up and I was in the city. I left the scope out that night so I could get
up early the next morning to look at Saturn and Jupiter.
I did manage to get up early on Sunday morning to look at the big planets. The
following is an excerpt from the email I sent to Mike Spooner that day that best
describes my feeling on the scope's performance:
"Well, I got up a 4am and looked at Saturn and Jupiter. Saturn looked wonderful and I
was able to observe it at 433X with some seeing effects. B-ring Spokes and the Enke
division were visible along with the brighter six moons and some minor glimpses of
Mimas."
"Jupiter was lower in the sky and closer to the roof behind us, so the views weren't
quite as good. I was able to observe it at 285X and occasionally at 433X when it was
higher and the seeing momentarily cleared up. Ganymede wasn't steady enough to see
any shading and barely a disk due to the seeing."
"I have to say that I'm quite pleased with the performance of the scope since your
last 'tune-up'. Now I'm going to have to continue the write-up on the scope on my web
site. I haven't updated the saga of the scope in some time now, I guess since RTMC."
"Thank you very much for the last tweaking of the lenses, you're certainly a master of
the glass. So, are you now ready to tackle a 10" folded apo?"
As you can read from the excerpt, the Lurie-Houghton is now living up to my
expectations. I'm very satisfied with it and have to say that the effort was
definitely worth it.
Star Parties 2001
I took the scope to my club's dark sky observing site on the 21st of September. The
moon was half way to first quarter and set around 9:30pm, so I started by observing
the moon. The seeing was not too good and heat waves were very visible, otherwise, the
moon looked good and was very contrasty. As the evening cooled off the seeing improved
to fairly good, and some of my club friends showed up.
Neptune and Uranus were up high in the south, so I decided to look at them and try to
find Triton. Triton was easy to find, especially with the help from one of my
planetarium programs. One of the guys suggested looking for the moons of Uranus. I've
never tried that before so I tried it and was able to spot four of the moons: Ariel,
Oberon, Titania, and Umbriel. With impetus from a recent Sky & Telescope issue
we went on to look for globular star clusters that orbit M31, the Andromeda Galaxy. I
was able to find the three I tried for which were G1, G2, and G73. The last one wasn't
mentioned in the article, but was in a guide book that one of my friends had with him.
G2 is very faint and stellar, but G1 and G73 are easy to find and slightly fuzzy.
Later that night, actually early Saturday morning, I viewed Saturn. The seeing allowed
magnifications of about 360X and Saturn was as beautiful as ever. There was a very
distinct cloud band in the southern hemisphere that was the color of chocolate milk,
the Enke division was visible and the C-ring was very easy to see. With Saturn on its
way to quadrature, it had a very nice 3-D effect. I then spent some time oogling at the
area around the Great Nebula in Orion. I'll always enjoy looking around there. In a dark
sky site like where I was, the view is astonishing. To finish up the morning, I looked
for the Horsehead Nebula and was just able to make out a slight darkening where this
dark nebula exists. First time for me!
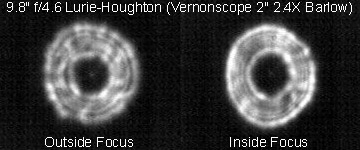
Vega Star Test
Here is the result of using my QuickCam camera to photograph what a star test looks
like. I used Vega which was just a little west of the zenith and my 2" Vernonscope
2.4X Barlow lens to increase the magnification.
Except for the inside of focus image being somewhat brighter and just slightly
crisper, the intensity distribution of the diffraction rings show that the correction
is extremely good.
Some More Comments
In practice, the primary mirror mount has worked very well. It's easy to adjust and
holds collimation. I highly recommend this design and would most certainly use it
again. It's very simple, wastes little space behind the mirror, holds collimation
for extended periods of time with handling and vibration, and the mounting ring that
attaches to the telescope tube provides protection to the mirror and stiffening of
the tube.
I don't use the two little blower fans I installed at the front of the tube behind
the corrector. I learned that they introduce what looks like spherical aberration to
the stars while star testing. Instead I use a back cover with a fan on it. Initially
I had the fan blowing into the tube behind the mirror but I found that it also
introduced some spherical aberration, but not as bad as the front mounted blowers. I
used it for initial cool down and when I was not actively observing. Since then I have
reversed the fan so that it sucks the air out of the tube from behind the mirror. This
works significantly better and does not introduce any visible aberrations or vibration.
I now run the fan continuously and see better images.
Anti-Reflection Coating
During the monsoon season of 2002, I took the two lenses that make up the corrector to
ZCR Coatings in Torrance, California. I had them apply their BBAR BARC-5 broadband
anti-reflection coating to all four lens surfaces. When I got the lenses back from them
they were almost invisible. With the telescope reassembled, it looked as if the secondary
mirror assembly was floating in mid air. The only way to see the lenses was to look at
the direct reflection of a light source.
The big questions is, did the coatings help the telescope for visual observing? It's hard
to answer because a direct side to side comparison can't be done, but I've been able to
see faint objects near bright ones and more details seem to be evident in galaxies.